My Petrol Chainsaw will not tension the chain correctly
Created by Chris McHale, Modified on Wed, 1 Jul at 11:40 AM by Chris McHale
If the chain on your petrol chainsaw cannot be tensioned correctly, it is usually caused by incorrect adjustment procedure, a disengaged tensioning mechanism, or the chain brake still being engaged. On models such as the Spear & Jackson CS4100 and S4140PC, chain tension is controlled using a lever and external tension knob system.
Incorrect chain tension can make the chainsaw unsafe to use, so it is important to set it correctly before operation.
Quick Answer
If your chainsaw chain will not tension correctly:
- Ensure the chain brake is fully disengaged.
- Release the bar locking lever.
- Use the external tensioning knob to adjust chain tightness.
- Hold the guide bar steady while adjusting.
- Re-secure the bar using the locking lever.
- Check that the chain lifts slightly from the guide bar but remains snug.
If the chain still will not adjust, the tensioning mechanism or guide bar may be worn or incorrectly seated.
Before You Begin
Before adjusting the chain:
- Switch off the engine completely and allow it to cool.
- Remove the spark plug cap to prevent accidental starting.
- Place the chainsaw on a stable, flat surface.
- Wear cut-resistant gloves when handling the chain and guide bar.
Correct chain tension is essential for safe operation and prevents chain derailment or premature wear.
This guide applies specifically to:
- Spear & Jackson CS4100
- Spear & Jackson S4140PC
Other models may use a different tensioning system.
Steps
Step 1 – Disengage the Chain Brake
Ensure the chain brake is fully released before making any adjustments.
If the brake is engaged, the chain will not move freely and tension cannot be set correctly.
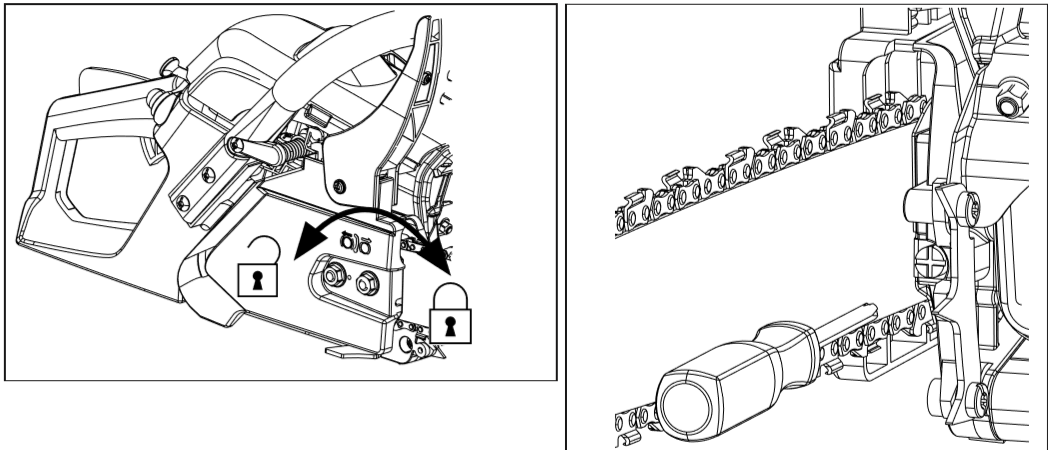
Step 2 – Release the Bar Locking Lever
Locate the bar locking lever on the side cover.
- Pull out the lever on the adjustment knob.
- Loosen it slightly to allow the guide bar to move.
This releases pressure on the guide bar and allows tension adjustment.
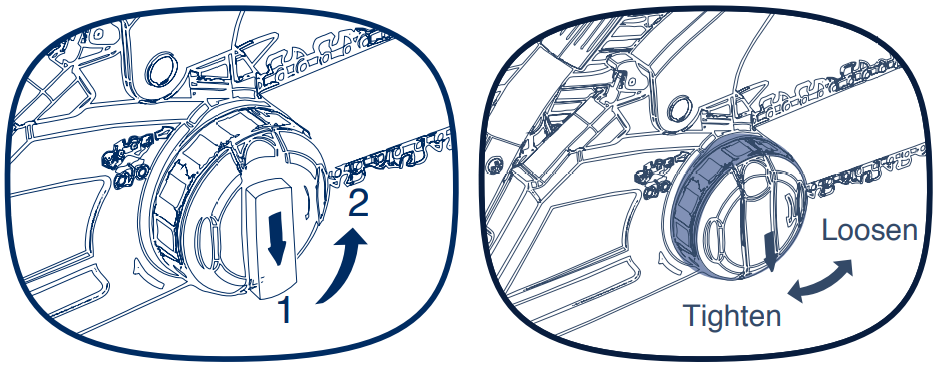
Step 3 – Adjust the Chain Tension
Using the outer tensioning knob:
- Turn the knob to increase or decrease chain tension.
- Adjust gradually while checking chain movement.
At the correct tension:
- The chain sits firmly in the guide bar groove.
- It can still be lifted slightly to expose one drive link.
- It springs back into position when released.
Do not overtighten the chain, as this can cause excessive wear and poor performance.
Step 4 – Secure the Guide Bar
Once correct tension is achieved:
- Hold the guide bar in position.
- Turn the locking lever clockwise to secure the bar.
Ensure the bar is fully locked in place and does not move.
Step 5 – Final Check
After tightening:
- Rotate the chain by hand (wearing gloves).
- Confirm smooth movement around the guide bar.
- Check that tension remains consistent after locking.
If the chain becomes loose after tightening, repeat the adjustment process.
Frequently Asked Questions
Why won’t my chainsaw chain tension properly?
Common causes include an engaged chain brake, incorrect use of the tension knob, a loose guide bar or wear in the tensioning mechanism.
How tight should the chain be?
The chain should sit snugly in the guide bar groove but still be able to lift slightly from the bar and return into position.
Why does my chain loosen after tightening?
This may happen if the guide bar is not fully locked in position, the tensioning mechanism is worn, or the chain has not been properly seated in the bar groove.
Can a worn guide bar affect chain tension?
Yes. Excessive wear in the guide bar groove or tensioning system can prevent the chain from holding correct tension.
Is it safe to use the chainsaw if I cannot tension the chain?
No. A loose chain can derail during use, while an over-tightened chain can cause overheating and damage to the bar and sprocket.
What should I do if the issue continues?
If correct adjustment does not resolve the issue, the tensioning mechanism, guide bar or chain may be worn or damaged and require inspection or replacement. Contact technical support if needed.
Was this article helpful?
That’s Great!
Thank you for your feedback
Sorry! We couldn't be helpful
Thank you for your feedback
Feedback sent
We appreciate your effort and will try to fix the article